Why this series exists
Most tutorials for this kind of thing are videos, and everything that matters in them — the clicks, the timing, the feel — is basically invisible to an AI. This series is my attempt to write it all down as plain text: something an AI can read, understand, and build on by itself. Filling a gap in the reference material, essentially.
The big idea
In games, attacks usually come with a slash effect — a flash tracing the arc of the weapon, both as visual feedback and as a hint of the attack’s range. The way I think of it: the trail a sword leaves behind.
There are two practical ways to build one in-engine: with a mesh, or with a trail renderer. This article only covers the mesh approach.
The whole trick of the mesh approach is a clean split of responsibilities: the mesh owns the shape and the trajectory; the texture owns the look. You model the slash’s silhouette, then lay a texture over it using straight, normalized 0-to-1 UVs. Bend the mesh and you bend the slash’s path. Repaint the texture and you change its pattern.
Compare the alternative — doing the whole thing with sprites. Short of hand-painting every frame, the only way to mass-produce frames is to build a similar pipeline anyway and bake the results out. The parameters are painful to tweak, and you’re burning VRAM for nothing. Mesh + texture cleanly decouples “where it goes” from “what it looks like”: the mesh decides where the slash enters and exits, the texture decides whether it’s pretty, and neither steps on the other. Once that split is clean, every knob you’ll want later comes for free.
The silhouette
First thing to build: the silhouette.
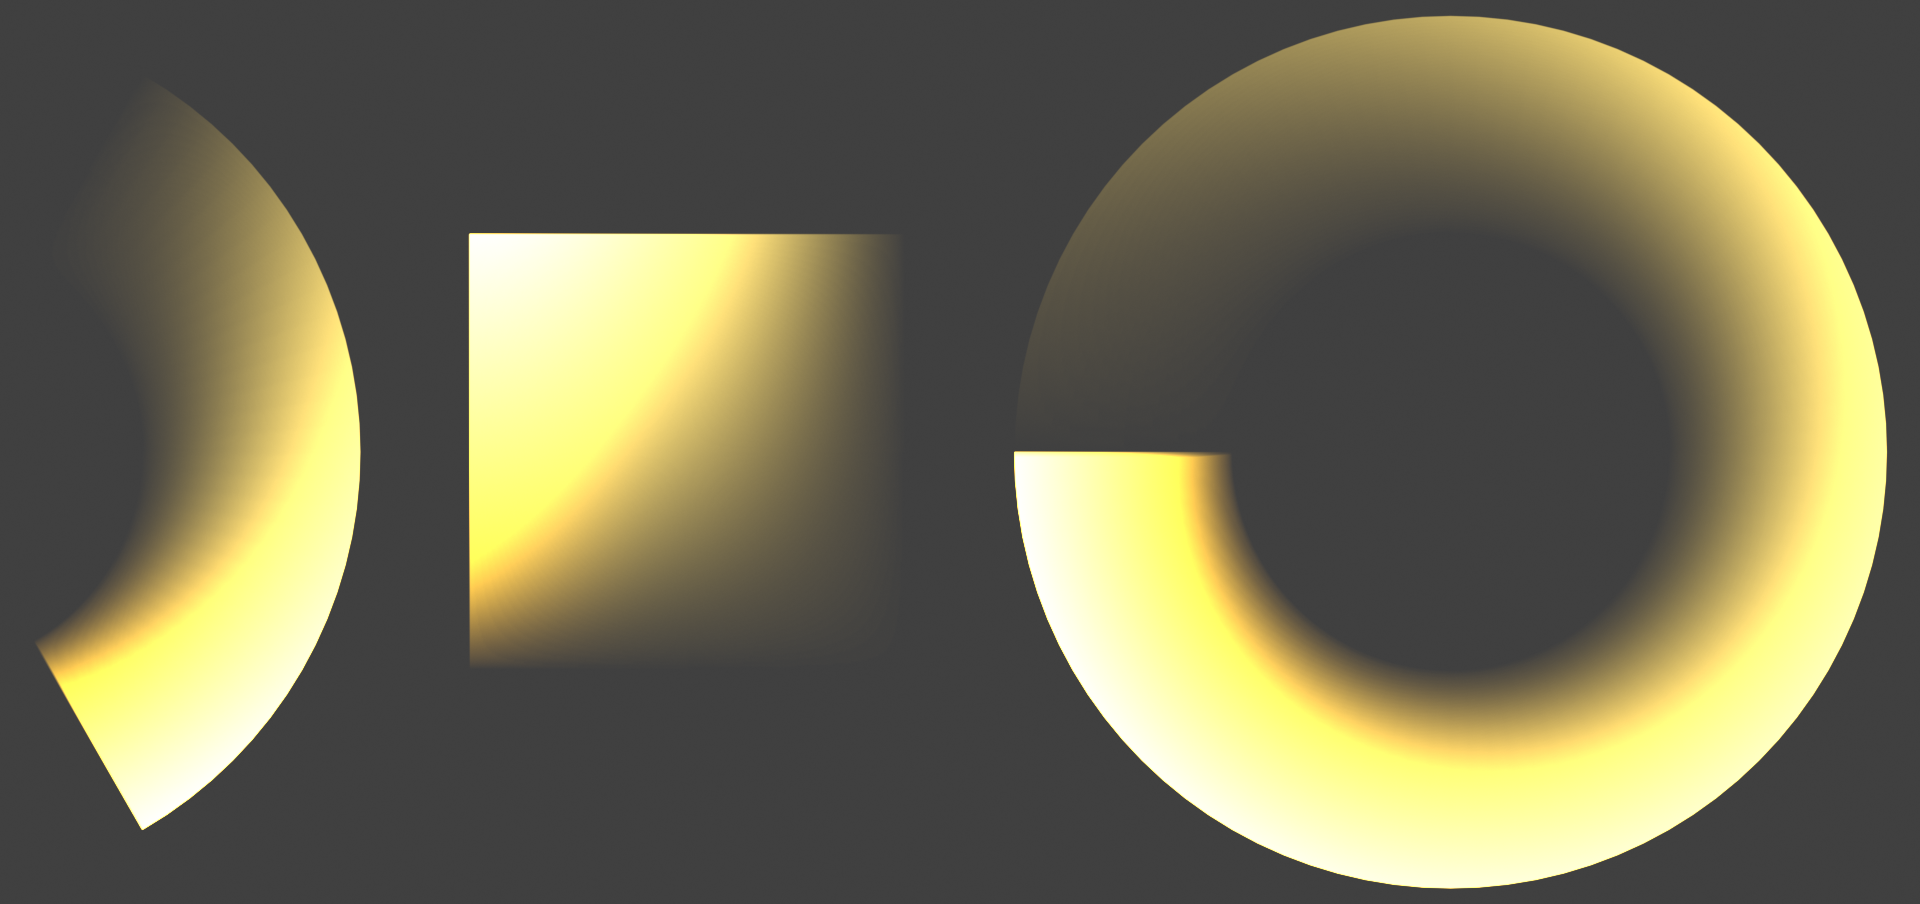
When you model it by hand, what you’re really doing is a parametric mapping. Here’s the goal: in UV space, the texture sits flat in the 0–1 square like an ordinary rectangle — nothing fancy. Meanwhile, the mesh itself bends through 3D space along the arc the blade swept. Sounds contradictory, but that’s exactly the point of the split: keep the UVs boring so the texture can rely on them, and let the mesh absorb all the curvature.
For the classic arc-shaped slash, think in polar coordinates. U is the swing’s arc unrolled flat — that’s your angle. V is the slash’s width from inner edge to outer edge — that’s your radius. A plain flat rectangle gets bent into a fan or a crescent. The UVs never break; only the shape bends.
Weirder slash shapes work the same way. You’re just swapping in a different mapping from “boring UVs” to “target shape.”
The texture
There’s a lot of room to get clever here. A more advanced setup splits the channels — shape in R, highlight in G — and hands the knobs over to the artists. But this is a first-principles article, so let’s keep it dead simple: one grayscale image, or a hand-painted RGB one, slapped straight on.
What the texture really is, at its core, is a gradient along U and another along V. Simplest version: 1 in the top-left corner, fading toward 0 as you go right and down. A slash usually grows in from one side, and a right-handed cut mostly sweeps right to left — so you put the bright end on one side and the empty end on the other, to line up with the direction the texture will scroll later.
Not that it matters much. If you ever need it the other way around, flip the UV in the shader, or just mirror the texture and move on.
The animation
Motion is the soul of any effect. With the mesh and texture done, all that’s left is to make it move — and the entire animation runs off a single value: the slash’s progress, 0 to 1. Everything downstream follows it.
The lazy hookup is to wire progress into opacity or scale so the slash doesn’t pop in and out — plenty of effects do exactly that. But we’ve already handed the trajectory to the mesh, so there’s a much nicer option: scroll the texture in along that trajectory. This is the moment all that insistence on straight UVs finally pays off.
The mechanism is just a slide. Progress is how far the texture has slid into the slash. At 0, the whole image is still parked outside and the slash is empty. At 1, it has slid all the way in and the slash is complete. Implementation-wise, it’s one line: add offset = 1 − progress to U when you sample. That’s the slide.
Two conditions for this push-and-pull to work: the sampling source has to be bounded, and the edge you’re pushing toward has to be empty. The easiest way to guarantee both is to use an image texture.
And progress doesn’t have to be linear. A good slash feels fast on the strike and slow on the follow-through — so just run progress through an easing curve that matches.
Closing notes
In my testing, GPT5.5 with BlenderMCP inside the CODEX APP, at medium thinking effort, already gets respectable results. DEEPSEEKV4PRO in OPENCODE at MAX thinking effort gets the big picture right but keeps fumbling the details — insisting on procedural textures it can’t actually pull off, that sort of thing.
In principle, though, you should be able to fix all of that just by pointing out what’s wrong and iterating a few times. And that probably stays true for GPT5.5 and whatever comes after. An AI can’t read your mind — it may never fumble the technique or the process, but the effect you actually want will always have to come from you.